My adorable owls made the Cupcake Blog today!! :D
http://www.thecupcakeblog.com/nesting-owl-baby-shower-cake-and-cupcakes/
Monday, November 28, 2011
Wednesday, November 23, 2011
How to Make Adorable Turkey Cupcakes
I wasn't about to let Thanksgiving slip by without making some kind of festive cake treat! I can't take the credit for this particular design, I saw a video on MyCakeSchool.com several months back about these adorable cupcakes. I decided they needed to be shared. Melissa has such wonderful, easy, cost-effective and creative ideas on her site. I also appreciate her skill and teaching techniques and am determined to share my new knowledge with all of you. These are just too dang easy and adorable not to make!

I am also an avid follower of the Cake Wrecks site, and for anyone who hasn't yet jumped on that bandwagon, cake-obsessed or not, you really need to look at this website. One of the highlights this time of the year, you will notice, are all the professional fall and Thanksgiving cakes that resemble piles of poo....i.e. the turkeys, cornucopia, acorns, etc. As funny as it is, it's also very sad! I promise you, I will do justice to the turkey cupcake!
Let's get started!
First you will need caramel squares. Easy and very inexpensive to find. Heat them in the microwave for about 6-10 seconds to soften them, and they will be as easy to work with as fondant. If they are too sticky, lay them out on parchment paper until they cool just a bit.

Then you need some colored buttercream for the tail feathers. I chose red and yellow. Orange is also very nice!

You will also need some piping tips. This one is the #81 crescent tip, it's not necessary, but makes some fun detailed "feathers" on the body of the turkey.

The Wilton #104 petal tip is for piping the tail feathers.

You will also need at least one small piping tip, Wilton #1-4. You only need one. I used the #2 tip for the wattle.

I used the #4 tip for the beak. Please don't judge. Yes, my tip has been eaten by the garbage disposal!

First, roll the caramel into a ball. You can break some off if you want a smaller turkey body. I didn't do that.

Then flatten and round the bottom out, to form the shape of the turkey's body.

Roll the upper half between your fingers to form the neck.

Flatten the top to form the head. Reshape the body, neck and head to your liking.

Use the #81 crescent tip to make feathers on the body.

Voila!

Next I used a Food Writer Pen to make the eyes. You can use gel coloring as well.

Now to work on the tail feathers. Take your cupcake, and with a Wilton #104 petal tip, hold the skinny side of the tip facing away from you. Make loops with your piping tip, going out and back in, as if you were drawing a flower petal. Depending on how you hold your tip, you can create thinner loops, wider loops, flat loops, or loops that stand up.

Don't go all the way around with your feathers.

Next, begin your second row of feathers. Make smaller loops for the second layer, so the bottom layer of feathers will show. Also again, don't make a complete 360 degree circle.

Now place the turkey body on the cupcake. It's time to make the beak! Using the #4 Wilton tip, apply pressure to your piping bag, make a dot, and release the pressure as you lift the tip to create a point for the beak.


Using the Wilton #2 tip, pip the wattle. This is done the same way as the beak: apply pressure to your piping bag to make a dot, and drag the tip down to form the wattle and release pressure as you pull away.

And there you have it. In literally minutes you have fantastic cupcake toppers for Thanksgiving!

Gobble, gobble. Happy Thanksgiving!

November Cake Project
Whenever possible I like to participate in the Miso Bakes monthly cake challenge. Miso made my heart happy this month when she chose the Wilton #233 grass piping tip for the challenge....I love this tip. I'd say it is definitely in my top 3 of favorite piping tips to play with!
The cake is supposed to be red and/or orange. I chose a dark and bright shade of each. For some odd reason, as time went on today, and possibly also the crummy weather and lighting in the Puget Sound this time of year and especially today, my cake now looks purple, pink and orange. Hmm. Well nevermind that small detail!
I am supposed to bake a birthday cake for my wonderful cousin Cody who is coming to visit me tomorrow...for Thanksgiving and his birthday of course...and because I have been out of town and busy baking for my son's birthday, well Cody gets to inherit this cake as his birthday surprise. Haha, sorry Cody! But I promise it tastes wonderful!! :D
So, let's have a look, shall we?!
Okay, so far so good...

Wait, what the HECK is going on?! Is it an anemone? A koosh ball? Shag carpet??????

Haha, it does sort of maybe resemble a furry monster. Like Animal from the Muppets!!! :D

I can't help it though, I just LOVE this cake!!!

We'll see how well it stacks up compared to the rest of the challengers. :D
Tuesday, November 22, 2011
Dirt Bike Cake
My baby boy Zachie turned 3 this week, I just can't believe how quickly time flies by! I remember when he was a wee little bugger. With his big blue eyes and his long, curly hair. So cute and cuddly.

Now he's a fiery 3-year-old! Tall, all baby chub gone, short hair. Still cute and cuddly though! :D Here he is, ready for his big boy birthday party. And also ready to steal the dirt bikes off the top of his cake!

Zachie chose a dirt bike theme, which isn't a surprise. He is addicted to riding dirt bikes. I'm pretty sure he'd live on one if he could!
I had grand plans for this cake, unfortunately I was out of town the entire week before I had to make it and just couldn't execute, even with lack of sleep, my dream dirt bike cake. Honestly also, no offense to Walmart, but the cake I had planned initially was going to end up to "Walmart cake-ish" for me. Nope, not happening! So the day before I quickly changed my mind. :D
The accent cupcakes in this photo spell out Z-man, which is one of Zachie's many nicknames.

Due to lack of time, and transporting the cake and assembling it three hours from home, I went with a small 6" cake, covered in fondant and hand-cut decorations. The cake is of two bikes, clearly, crossing the finish line. Had I remembered to take a photo of the back of the cake you'd be able to see that. DOH!

My son was impressed with the cake, which is all that matters. The rest of the family enjoyed the Oreo cookie Swiss meringue buttercream!! Yum!

I baked two dozen accent cupcakes to go along with the cake for guests to eat. Each were decorated with hand-cut fondant pieces: dirt bike helmets. racing flags, pieces of the track, and the #3 for Z's birthday.


And there you have it, the rest is history! At least until my oldest son's 5th birthday! :D
Monday, November 7, 2011
Kitchenaid Mixer Giveaway via Family Fresh Cooking
For anyone who's interested in winning a brand new 7 quart Kitchenaid Mixer...yes, I would be one of those people, you should enter this contest!! Yippee!!
http://www.familyfreshcooking.com/2011/11/06/kitchenaid-stand-mixer-giveaway/
http://www.familyfreshcooking.com/2011/11/06/kitchenaid-stand-mixer-giveaway/
Sunday, November 6, 2011
Owl Baby Shower
I would like to send love and congratulations out to my friends Chez and Olivia Wilson.....very soon they will be blessed with a wonderful baby girl! This past weekend I hosted their baby shower, featuring the owl nursery theme they chose. I was secretly (selfishly) excited about this theme for months...why wouldn't I want to make an owl cake?!
I really debated back and forth on this one for about a month. Did I want to make a 3-D cake? Did I want to make a 2-D cake? Did I want to make a two-tiered cake? Did I want to make a small cake and cupcakes? WHAT should I make?!?! I finally decided on three-dimensional with the look and feel of a two-dimensional graphic, and accompanying cupcakes. Confused yet?? Mainly, three dimensional figures with only the fronts decorated to mimic images from the nursery, with two-dimensional cupcake toppers.

The cake was piped with a petal pattern, and I added three dahlias to the front of the cake...just because I like them. :D I just love PINK!!

Featured on the cake are a family of owls...dad, mom and baby sitting in a nest. The owls were made free-hand, not using any cutters or molds.

Hello, dad...


Hello, mom...
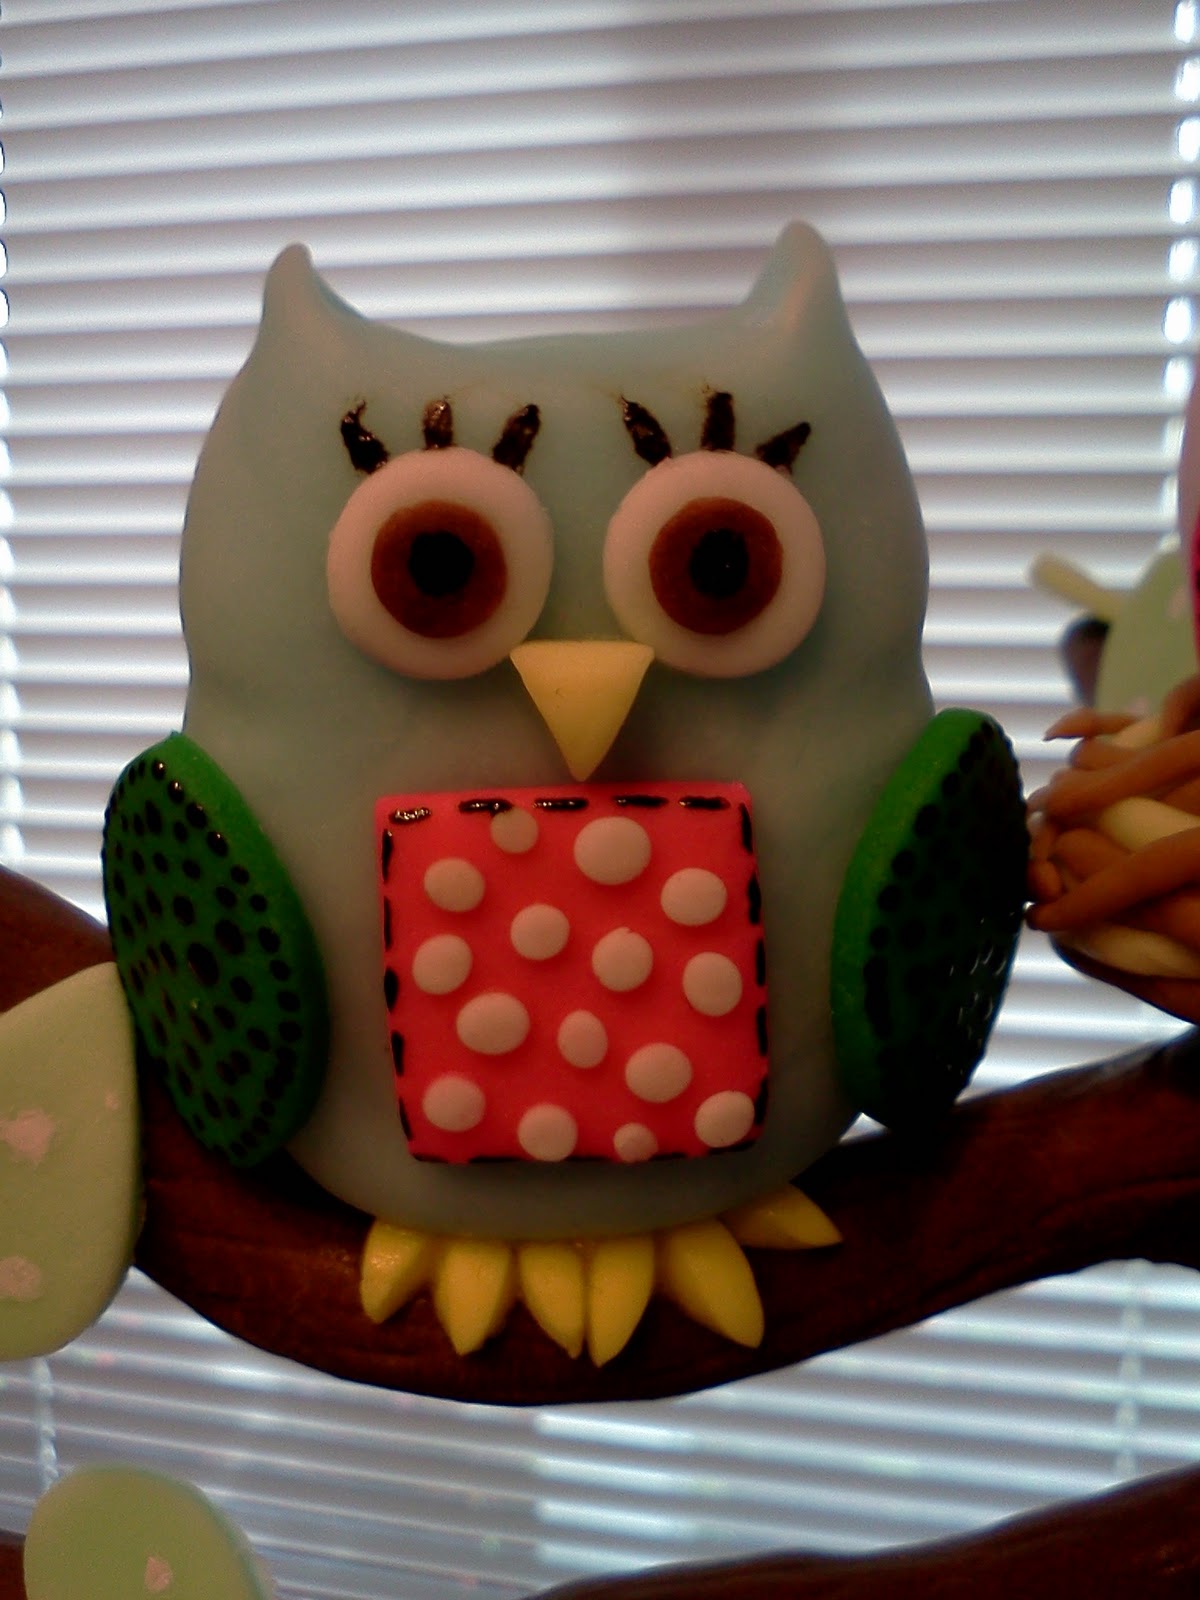

And then there's baby....


The cupcakes were created from the nursery bedding...


The fondant decorations were cut by hand, and also hand painted.


The cake and cupcakes are all red velvet cake with cream cheese Swiss meringue buttercream...as tasty as they are adorable!

Congratulations, Chez and Olivia!

Subscribe to:
Posts (Atom)