Monday, September 26, 2011

Miso Bakes September Cake Project

I posted about the orange monstrosity several weeks back. This is part 2...the new and MUCH improved version!

This cake is for the Miso Bakes September Cake Project. I picked the piping tip this month, which is a Wilton #81 petal tip, the color, orange. Thanks to Miso for making the rules for this month's challenge much easier than mine originally were....because this cake actually did turn out as good as I was hoping it would!


This cake is colored in an ombre style, with color gradients going up the cake starting with dark orange at the bottom going to light at the top.

I went with a simple striped design for this cake. Simple often is better.


I piped flowers on the top, which is actually what this tip is for. Again simple, and very elegant.

Here is a top view so you can see how stunning these flowers look. I made the same flowers with this tip for my cupcake bouquet back in July as well.

And there you have it. This is actually a cookies and cream cake topped with mint SMB...although it's orange, it still tastes like a mint Oreo cake. :D

I will post the link to Miso's blog once she posts the September entries for the project.

Cookies and Cream Cupcakes

There is nothing else to say here except....YUM.


I have been wanting to make Cookies and Cream Cupcakes, and there are endless ways in which you can make them so I won't go into much detail about mine here. One of the main reasons I did these cupcakes is because I have been on a quest for a good vanilla cake recipe. Many of them I find dry out too quickly, some just don't have that great of a flavor, and others are insanely complicated! So I have been working hard to figure out why I haven't found THE recipe I love. Don't get me wrong, I make some good vanilla cakes, but not one I personally would sacrifice eating a chocolate cake for. Until maybe now.

I wanted to find a good vanilla base to use for the cookies and cream recipe, so off I went. 

I mention Sweetapolita quite a bit on this blog because I admire her....she, as a baker, is who I aspire to be like. I follow her work quite closely. And it just so happens that she is a tad more obsessed with vanilla cakes than I am (her obsession comes from her love for vanilla, mine comes from the fact that I feel I could and should like it more than I do). Last week she posted on her blog a discussion of her various vanilla recipes and the differences between them. I have tried a few and they are all very delicious...but still. I was still looking for THE ONE. This weekend I think I found it, it is Sweetapolita's White Out cake recipe (which she got from a bakery in NYC), which you can find here.

This is by far the most amazing vanilla cake recipe I have tried yet, in taste and simplicity. When the Oreo cookies were added to the batter it ended up tasting quite a lot like chocolate chip cookies. Oh my, so good! They are topped with a dark chocolate and Oreo cookie Swiss meringe buttercream. Enough said. :)

Several people have asked me for good recipes, especially ones that won't dry out. Rosie goes into detail about why, especially vanilla cakes, can give you so much trouble. These are some of the many issues I have encountered in my baking adventures also...she just summed them all up so nicely! You are encouraged to read her blog if you want to know the secrets to good vanilla cakes. Otherwise remember these things:

1. Butter-based cakes, which vanilla cakes are, tend to dry out quickly, especially if refrigerated for even a short amount of time. Chocolate cakes stay moist much longer, even after being refridgerated, because they are made with oil.
2. If when mixing your cake batter your batter starts to look curdled, that means you added too much liquid to your batter, which is very easy to do. This will result in a flatter, more dense cake. In all honesty, you should use a digital kitchen scale to measure your ingredients for your cakes! It is also easy to ruin the consistency and taste of your cake by adding too much flour. I lecture you on this yet I still need to invest in my own scale. :D
3. You need to be very careful NOT to overmix any of your vanilla cake batters!
4. This is the most important tip of all: follow ALL directions for whichever recipe you are using very carefully. There are many different methods for mixing cake ingredients and there is a purpose behind each one of them. If you don't follow the baking directions chances are your cake won't turn out the way you were hoping it would.

For now I am satisfied with my vanilla cake quest. Good luck with yours! :)

Fairy Cake

I have been looking forward to making this cake for a couple of months. For one thing, I am a girl...and I know how to make cute things that can make other little girls happy. And also, just look at this cake! How could I not want to make something this fun?! I am very happy with it, I won't lie. And so was the birthday girl!


This cake took me a little over a week to make. I began by making the fairies. The basic principles for making characters that I explained in my "How to Make Fondant Scarecrows" blog post are the same that I used for making these. Obviously though the fairies are larger, more detailed and took a much longer time to dry, which is why I made them first. These would probably take 5 days to completely dry. You don't want to move them around until they are completely dry, if possible, and even then they are very fragile.

I made a flower fairy, a butterfly fairy, and an animal fairy. Oh yeah, I have been schooled on the different kids of fairies that there are, that they have pom poms on their feet, etc. etc. I just kind of went with what I thought was cute for these, though, and I am very pleased with how they turned out.

This is the butterfly fairy, I think she's my favorite.

This is made to look like the birthday girl...this is the flower fairy.

This is the animal fairy.

I later added flowers to their hair, but I waited a few days to do that. I also added magic wands in their hands, which are made from flowers that are sitting on top of a piece of uncooked angel hair pasta.

The next things I made were the animals. Especially because the deer has a large head and quite a bit of fondant in the neck and body, it also needed several days to dry.


Last came the butterflies and flowers.


For this cake, the birthday girl loves lemon, so I made a vanilla cake with lemon curd filling and lemon Swiss meringue buttercream. I didn't want to just make any vanilla cake though, I chose to make a rainbow cake. This is not an original concept by any means on my part, it is something that is very popular in the cake world right now. This particular recipe came from the Whisk Kid blog. Kaitlin is 20-years-old and 100% amazing so I recommend that you take a look at what she has going on on her site...
 http://www.whisk-kid.com/ Prepare to have her blow your mind. :D

The photo below shows the color array, these are the 6" rounds I baked for the top tier. The bottom tier is 9" rounds, all the same colors. I used all 6 for the bottom tier, the top tier was getting a little unstable so I only used 4 out of the 6 layers.

This is what the bottom tier looked like before I added the crumb coat, it's 6 layers of color filled with the lemon curd and lemon SMB. Very vibrant! And somewhat messy in this photo. :)

I saw a recent post on the Sweetapolita blog that featured some amazing color transitions in her buttercream. I decided to try it out for myself...I think the colors turned out great on this cake! I topped the cake with pink, with dark purple transitioning into light purple on the sides of the cake.

WOW that's a lot of cake! ;)

Then I assembled the cake. The cake was topped with the flower fairy and her flower garden. Everything you see was made with fondant or gumpaste. The grass is buttercream piped with a Wilton grass tip.


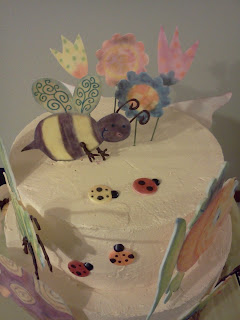
The animal fairy was accompanied by her turtle, frog and deer friends. So cute!


The butterfly fairy was surrounded by fondant butterflies. The tree stump she is sitting next to is actually a scrunched up granola bar covered in chocolate fondant!


I can't help it, I love the toadstools, ladybugs and snails!

This was a photo the mom of the birthday girl took at the party, the colors are amazing on the inside of the cake!!


So what happened to the two leftover layers that I didn't add to the top tier? I kept the "boy" colors so my two cakelets could have some cake fun of their own.


How adorable are those two cuties? ;)

How to Make Fondant Scarecrows


I by no means claim to be an expert on making fondant scarecrows. I'm sure there are some cuter examples out in the world. However, I do think these turned out pretty cute and make for fun and unique cupcake toppers! After all, fall isn't just about leaves and pumpkins! I thought I would share with you how you can easily make some of your own, although you can make them look however you would prefer, of course. :)

By the way I apologize, I was working on more than one project that weekend so I forgot to take photos from the beginning of the process. Oops.

Basically, start with any color "face" and "shirt" fondants that you want. I added Tylose powder to all of my fondant to make it more pliable to work with. Roll the face fondant into a ball and shape as you wish. I always use lollipop sticks to hold my fondant people together, you can use floral wire or whatever else you want. I just feel the lollipop sticks are far more stable and durable. I dipped my stick into egg whites, since that's what I prefer to use as a glue, and put the head on. Be sure to push the lollipop stick only halfway into the head, in case it settles or moves while you're making the rest of the body you don't want the stick to pop out of the top of your head! Pinch the bottom of your head to secure it around the stick.

Your "body" fondant should roll out long, be about the same width as the head. The head should be about 1/3 the length of the body, although I made them about half the length for these particular scarecrows. Put some egg whites onto the lollipop stick and push the body on. In this case I added a "collar," or a separate piece of fondant, in between the head and neck. I wanted this "turtleneck" look for my design. When making fondant people I would use a piece the same color at the face for a neck. Remember to pinch the base of the body around the lollipop stick for more security.

You can let these set for a few minutes just to let the glue take hold before assembling the rest of the body. I let mine sit overnight just to be sure the pieces wouldn't move while I assembled the rest of the components.

The next day, I painted on some goofy face. You can use edible food color pens, although I prefer to paint them using food color gels and with a paintbrush. You can mix it with lemon juice or vodka, although I just use the colors straight generally. I also painted some "hair," just enough that would be visible under their hats. I know, they look a little "old man-ish" right here.  


Next I assembled the hats. I cut out some scraggly orange pieces by hand from fondant and glued them as a brim around the scarecrows' heads. I also rolled a ball and formed it into a triangular shape for the top if the hat. Then I added a trim. You can see the pieces below. I assembled them on by one straight onto the head.


Then voila! We have a hat! I like details so I also added patches on to my hats, which are also cut by hand.


I also because I am overly obsessive about the details, I added a black bird onto the hats as well. I rolled them out and used tiny bird cutters that I had.


Ta-da!

The lollipop sticks also help to stabilize and secure the scarecrows to whatever base/cake you choose to put them on. In this case I wanted them to sit on pumpkins, and those would serve as the base that would sit on top of the cupcakes. So to make the pumpkins I rolled some orange fondant balls and added grooves into the sides with toothpicks. 

Once the pumpkins were formed I let them dry for several minutes. The next step is to roll some fondant out for the legs. It's best to roll out a long piece, at whatever thickness you would like your legs to be, that will wrap around the lollipop stick. To me this gives more surface area to glue the legs to the body AND give the body a larger space that it can sit on that will support its weight. Add the legs and body to the pumpkin (i.e. the base) as so below. Remember to use your eggs whites to glue everything together as you add it to the body!

Now the scarecrow needs some arms. Roll out two balls using the same color at the body fondant, you will probably need to roll them out and play with the thickness and length a little to get the proportional size you want.  I shaped mine like below.


Then glue them to the shoulders of your scarecrow. You may need to reshape your pumpkins a little and redefine your lines, since adding the weight of the scarecrows will alter them some. I feel, though, that adding the scarecrows on top of the pumpkins while the pumpkins are still wet is actually better than waiting until they are completely dry. It's easier to mold and glue things together like this while all the fondant is still soft. 

 This is what they end up looking like. I let them dry overnight before adding them to my cupcakes.


Once I added them to the cupcakes I used a Wilton grass tip to pipe on the hay coming out of the necks, hands and feet. Very cute and simple.


And there you have it, scarecrow cupcake toppers! :D

Friday, September 23, 2011

First of the Fall Cupcakes

I am a tad behind on my blog posts lately, however today IS the first day of fall so it's pretty appropriate that I should write this post today!


Last weekend I made the first of my fall cupcakes. Let me tell you, they are beautifully delicious. I seem to say that quite often about my baked goods but it's a true statement of fact. These cupcakes are so good you can't go wrong with them. I honestly can't take any credit for the cupcakes themselves, I used Martha Stewart's recipes with no alterations of my own. I found them on her website and really favored them for their richness of flavor and also simplicity as far as the list of ingredients and baking directions go.

For the pumpkin cupcakes I made a cream cheese Swiss meringue buttercream. I don't personally like cream cheese frostings all that much so I wanted the light and not-so-sweet nature of the SMB combined with a light dose of cream cheese. Believe me, this buttercream was a perfect balance of flavor and texture, especially paired with the pumpkin cupcakes. I would probably even top these with some pecans the next time. The one thing to keep in mind if you ever try a recipe like this is, the cream cheese makes the SMB soft so it's wonderful for icing but not piping onto cupcakes! They don't need to look fancy though, the taste supercedes appearance! They are also incredibly moist and stay that way for several days after baking.


For the apple spice cupcakes, these are rich and dense on their own and really probably don't even need buttercream. I made a maple bourbon SMB for these cupcakes, also again going light on the bourbon and maple. The buttercream was amazing and it fit well with the cupcake flavor. I kept some for decorating and for the plain cupcakes I added a caramel drizzle, which was also a wonderful complement to the apple. Both of these recipes I will most definitely be baking again!


To decorate these festively fall cupcakes I made some fondant scarecrows, pumpkins, and some fall trees.


The trees are made with dark chocolate candy melts, which I melted in the microwave and then piped the tree forms onto parchment paper. I added fall leaf sprinkles to the trees while they were still wet  then hardened them in the freezer for 15 minutes. Easy and very cute! These cupcakes are also featured in the Cake Appreciation Society's Facebook "House and Garden" photo album.


The scarecrow cupcakes will be featured in a separate blog post with a "how-to" for making fondant scarecrows!

Monday, September 12, 2011

Ten Little Ladybugs Cake

A few weeks ago I asked my Facebook cake "followers" to propose a cake challenge for me. Honestly most of the suggestions were pretty easy and I really wanted to try something new that would be difficult for me. My boys have a book called Ten Little Ladybugs that I love, mainly for the illustrations. I've always been intruiged by them and have been thinking: "how awesome would it be to make this book into a cake?!" Mind you, I am not an artist! So I figured this was the perfect challenge for me and I decided to make a cake based on the ladybug book.


This is an easy and fun idea for a cake that doesn't require a lot of cake decorating supplies. I made the characters in small spurts, since this was just a "for fun" cake idea. So after three weekends of painting the fondant characters little by little, they were finally finished. I started the process by tracing the outlines of the characters out of the book onto parchment paper. Yes, I traced! As I said, I'm not an artist! :D Then I cut them out.


I then used the parchment cut-outs as a pattern to cut the characters out on rolled out white fondant. I laid the fondant out onto parchment paper and let them dry for a couple of days before coloring. Drying time will depend on the humidity in your area. In my case drying takes longer!


Then I began coloring the fondant characters with petal dust. I just used the dry petal dust, but if you add lemon juice or vodka to the dust you can have more of a watercolor effect to your coloring. I prefer the flexibility that the dry petal dust offers though. The painting I did was freehand.


The butterfly and the bird were not really attractive illustrations in the book in my opinion. I think this was reflected in my painting skills too. ;D


The rest turned out really well! I even surprised myself! (The frog actually looks better on the cake because I got some dark green petal dust after taking this photo.)


I also cut out the ladybugs using round cutters and painted them, I just didn't take pictures of those. Or the flowers!

Then I took some 10" and 12" cake forms....these are styrofoam cake dummies....and put some orange buttercream on it. WHAT?! Yes...I said it. This isn't a real cake! :D Let me tell you, dummies are a pain to ice with buttercream!


To finish the characters I added black royal icing to the ladybugs and melted chocolate antennae and legs for the other bugs. I piped these onto parchment paper, stuck them in the fridge for 15 minutes to harden, and then adhered them to the fondant with more melted chocolate.

And there we have it, a cake that looks just like a story book!


Piece of cake!! (Or styrofoam...you know...) ;)


This cake is now also featured on the Cake Appreciation Society's Facebook page in their Sweet Bug Life photo album!