Wednesday, December 21, 2011

Small Cupcake Bouquet

I love all flowers, even in cupcake form!

So really it's no coincidence that I love piping buttercream flowers!


I haven't made a cupcake bouquet since this summer and I figured it was time. I've been dying to make another one!

I used the same method as in my July post about cupcake bouquets...using paper cups taped onto a vase. This bouquet held seven cupcakes total.


To me, they look pretty no matter which type of flower you pipe onto your cupcake. And of course, disco dust makes everything better!


I finished the bouquet with some gumpaste flowers and leaves, just to fill in the spaces and add an extra element of dimension.


Overall I think it's simple and tasteful. And delicious!


Not too pretty to eat though!!


I plan to make more of these in the coming months, they make very elegant gifts. This one was actually a Christmas gift. Who doesn't love flowers? Or cupcakes? Or flowers that ARE cupcakes?! :D

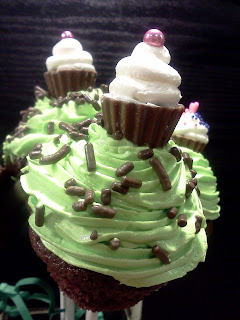
Mini Cupcakes with Extra Mini Cupcake Toppers


I just had to share these....such a simple and fun idea! I made some mini cupcakes, and topped them with extra mini cupcake toppers. The toppers are just mini Reece's peanut buttercups, and I topped those with buttercream using a small piping tip, and then sprinkes. So simple. So cute. Everyone loves them. So why not?!


These are great all on their own as cupcakes. You can decorate standard cupcakes with the same idea, just use the Reece's cups that are one size larger for the toppers.

To use these in a bouquet like I did (in the pervious post), remove the wrapper, place a lollipop stick through the center (only go halfway through the cupcake) and add a gum drop beneath the cupcake for support. Don't forget this step, it's the most important part!

These look adorable as part of a display with some cupcakes on a stick and some just sitting normally. If you are going to add them into a bouquet be very careful because you can easily break apart or knock over your cupcakes. I speak from experience here!

But they sure are adorable!


Birthday Cupcake Cake Pops

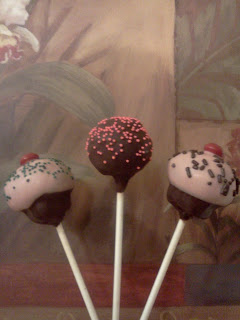
One of my co-workers recently celebrated a birthday and she requested cake pops. I know she loves red velvet, so these are an extra dark chocolatey red velvet cake with cream cheese buttercream. They are pretty darn tasty! My husband, Justin, is officially addicted to them as well! I guess this means I will be making Christmas cake pops too! :D

A few of the cake pops were a traditional round shape with sprinkles, but most were shaped like mini-cupcakes. They were shaped, dipped in chocolate candy melts first, then dipped in pink candy melts to form the "frosting." They were then topped with sprinkles and a red Skittle.

This is not an original idea of mine. The idea came from a Bakerella book. I personally think they're adorable, just like the rest of her work!


I then made a cake pop bouquet for my co-worker. But simple isn't usually my style....


...So the bouquet includes mini-cupcakes as well!


The mini cupcakes are the ones featured in a separate blog post. They are the same flavor as the cake pops, except with actual Cream Cheese Swiss Meringue Buttercream. Yum!


I like the one with the chocolate sprinkles...


Okay, the one with the purple sprinkles too...


And to be honest, the chocolate one with the bright pink sprinkles!


I think the birthday girl packed these up and took them home to Montana with her for Christmas!!


Of course she did. Who doesn't love a cake pop?! :D


Thursday, December 8, 2011

Christmas Cupcakes topped with Cake Pops

I explained in the previous post that I made these cupcakes for my annual volunteer appreciation Christmas event. I wanted to make both cake pops and cupcakes, so I made Christmas cake pops and turned them into toppers for these delicious dark chocolate and peppermint cupcakes!

The buttercream is a peppermint SMB, and I topped it with white sanding sugar and gold disco dust. I really and truly LOVE disco dust, as I have mentioned many times before! :D


Overall I think they turned out well and the cake pops were a unique and adorable way to decorate the cupcakes. 


Frosty's hat was made with Rolo's and pieces pf Reece's peanut buttercups. His pipe was made with fondant and spaghetti noodles. This cake pop was a little top heavy for some of the cupcakes though, but overall it worked out just fine.


Rudolph's antlers are obviously pretzels, and no other special materials were used to make him except a fondant nose. You could use an M&M or jelly bean for his nose too. 


The flower cake pop is made with a fondant flower that's topped with white sanding sugar, and green candy melt swirls.


The Christmas tree cake pops were shaped by hand, and after being dipped they were topped with either Christmas sprinkles or sugar pearls. I think these turned out so cute!


Almost too cute to eat...


Happy holidays! More Christmas treats to come!

Christmas Cake Pops

It's finally here, time to make Christmas treats!! I volunteered to make cupcakes for my museum's annual volunteer Christmas appreciation event this past week. Naturally...why wouldn't I volunteer to make cupcakes, selfishly giving myself the chance to make some fun, festive, holiday goodies?! Anyway.....I started off with the idea to make cake pops. Then I thought that wasn't sufficient enough so I decided to make the cake pops and turn them into....dun dun dun....cupcake toppers!!!

I am adding the cake pops as their own separate blog entry first just because they turned out really well and deserve some of their own recognition. And in the middle of the night when I was slightly tired and loopy I decided to have a cake pop photo shoot. The photos make me laugh...so I'd like to share.

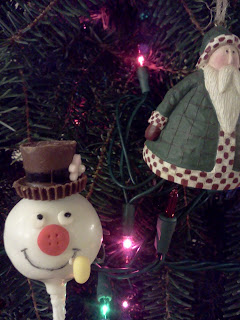
First we have....FROSTY THE SNOWMAN. I think this was my favorite cake pop. AND I just had to add the two photos I took because the way he's "lovingly" looking at Santa is just too funny. Again, yes I was very tired!


"Hello, Santa..."


Next is Rudolph the Red Nosed Reindeer. Or at very best Rudolph's cousin....or son maybe?? Either way, cute and delicious!


Next is the Christmas tree cake pop. I loved these. I decorated them with sprinkles, so there were three different types in all. However I likes the ones with the shiny sugar pearls.


Oh and there's Santa again, with the Christmas flower cake pop. Clearly, cookies are out this year and cake pops are IN!!


The next post will feature the cake pops as cupcake toppers!

Cupcake Blog Appearance

My chocolate peppermint cupcakes topped with Christmas cake pops made an appearance on the Cupcake Blog!!!
http://www.thecupcakeblog.com/chocolate-peppermint-cupcakes-topped-with-christmas-cake-pops/

Wednesday, November 23, 2011

How to Make Adorable Turkey Cupcakes

I wasn't about to let Thanksgiving slip by without making some kind of festive cake treat! I can't take the credit for this particular design, I saw a video on MyCakeSchool.com several months back about these adorable cupcakes. I decided they needed to be shared. Melissa has such wonderful, easy, cost-effective and creative ideas on her site. I also appreciate her skill and teaching techniques and am determined to share my new knowledge with all of you. These are just too dang easy and adorable not to make!


I am also an avid follower of the Cake Wrecks site, and for anyone who hasn't yet jumped on that bandwagon, cake-obsessed or not, you really need to look at this website. One of the highlights this time of the year, you will notice, are all the professional fall and Thanksgiving cakes that resemble piles of poo....i.e. the turkeys, cornucopia, acorns, etc. As funny as it is, it's also very sad! I promise you, I will do justice to the turkey cupcake! 

Let's get started!

First you will need caramel squares. Easy and very inexpensive to find. Heat them in the microwave for about 6-10 seconds to soften them, and they will be as easy to work with as fondant. If they are too sticky, lay them out on parchment paper until they cool just a bit.


Then you need some colored buttercream for the tail feathers. I chose red and yellow. Orange is also very nice!


You will also need some piping tips. This one is the #81 crescent tip, it's not necessary, but makes some fun detailed "feathers" on the body of the turkey.


The Wilton #104 petal tip is for piping the tail feathers.


You will also need at least one small piping tip, Wilton #1-4. You only need one. I used the #2 tip for the wattle.


I used the #4 tip for the beak. Please don't judge. Yes, my tip has been eaten by the garbage disposal!


First, roll the caramel into a ball. You can break some off if you want a smaller turkey body. I didn't do that.


Then flatten and round the bottom out, to form the shape of the turkey's body.


Roll the upper half between your fingers to form the neck.


Flatten the top to form the head. Reshape the body, neck and head to your liking.


Use the #81 crescent tip to make feathers on the body.


Voila!


Next I used a Food Writer Pen to make the eyes. You can use gel coloring as well.


Now to work on the tail feathers. Take your cupcake, and with a Wilton #104 petal tip, hold the skinny side of the tip facing away from you. Make loops with your piping tip, going out and back in, as if you were drawing a flower petal. Depending on how you hold your tip, you can create thinner loops, wider loops, flat loops, or loops that stand up.


Don't go all the way around with your feathers.


Next, begin your second row of feathers. Make smaller loops for the second layer, so the bottom layer of feathers will show. Also again, don't make a complete 360 degree circle.


Now place the turkey body on the cupcake. It's time to make the beak! Using the #4 Wilton tip, apply pressure to your piping bag, make a dot, and release the pressure as you lift the tip to create a point for the beak.


Using the Wilton #2 tip, pip the wattle. This is done the same way as the beak: apply pressure to your piping bag to make a dot, and drag the tip down to form the wattle and release pressure as you pull away.


And there you have it. In literally minutes you have fantastic cupcake toppers for Thanksgiving!


 Gobble, gobble. Happy Thanksgiving!